
DIY Dog Run
A modern country house can no longer be imagined without a dog run. This accessory allows for the keeping of one or more medium-sized or large pets on the property. While the construction of the house itself is straightforward, owners still have questions about the run. Once these questions are answered, they can confidently begin constructing this dog-friendly space.
Content
- 1 What a dog enclosure might look like
- 2 Standards for enclosures
- 3 Materials for building an enclosure
- 4 Wooden decking or concrete flooring
- 5 Does the enclosure need a roof?
- 6 The door is an element of special importance
- 7 Feeder device
- 8 Booth or winter house
- 9 Tools
- 10 Earth, concrete and wood
- 11 Flooring and frame
- 12 Roofing and insulation
- 13 Floor arrangement
- 14 Winter road cladding with door and mesh installation
What a dog enclosure might look like
The first step is to decide on the type of enclosure you'll be building. This decision is partly determined by the region where your country house is located. If you're building in the southern part of the country, the dog enclosure can be fenced in and have a canopy to protect it from the sun. However, in temperate climates, you'll need to consider building a kennel. In northern regions, the enclosure must be equipped with a winter shelter.
Once you've decided on the type, you need to calculate the enclosure's dimensions, which will depend on the available space on the property and the pet's breed.
Standards for enclosures
Too much or too little? This question will plague the owner of a four-legged friend during the initial construction phase. To clarify, it's important to know the minimum dimensions of dog enclosures:
- Not less than 6 m2 for pets with a height at the withers of up to 50 cm.
- Not less than 8 m2 for pets with a height at the withers of up to 60 cm.
- Not less than 10 m2 for pets with a height at the withers greater than 60 cm.
These parameters should be used as a starting point when choosing the optimal size of the fenced area. The number of dogs that will live in the enclosure should also be added to this data. If you plan to have more than one companion, you should add at least 50% of the available space for each.
Materials for building an enclosure
Once the size of the future structure has been determined, it's time to move on to the preparation work. But first, you need to decide on the materials from which the dog run will be built. There are plenty of options here, too.
The main materials for building a dog enclosure, which you can make yourself, are:
- tree;
- metal;
- brick;
- concrete.
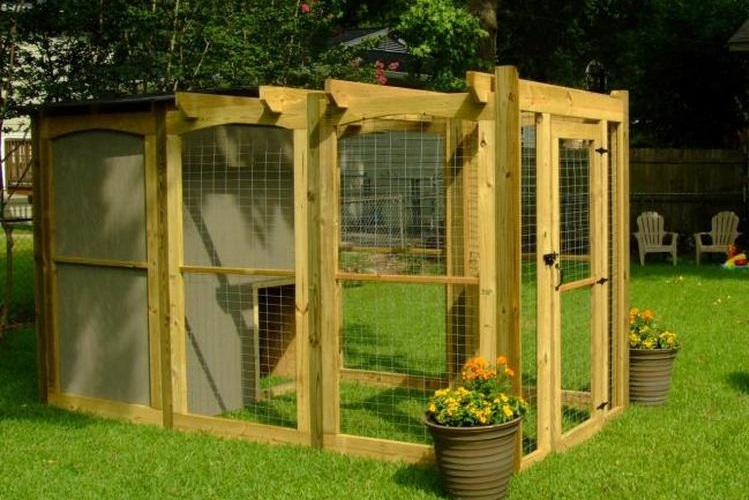
Wood is the base for the pet's house and the enclosure frame. This option is considered classic. The enclosure itself is enclosed with welded mesh or chain-link fencing stretched over posts. Wooden posts are installed around the perimeter, creating a space for your four-legged friend.
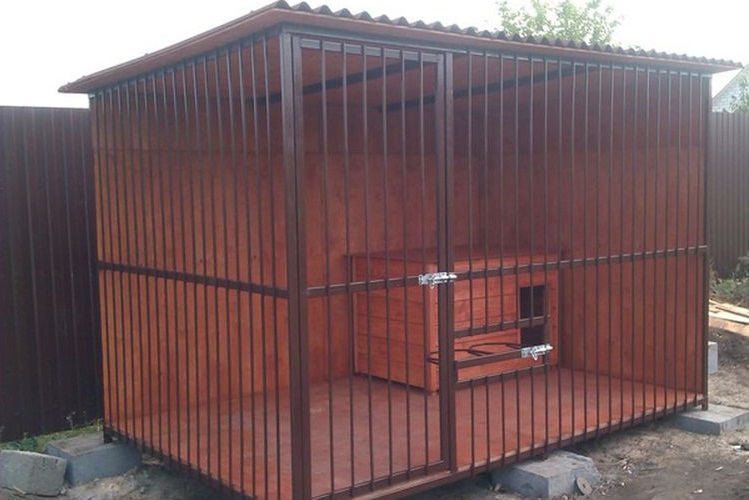
Metal can be combined with both wood and brick. In this case, the enclosure is no longer a mesh, but a lattice. It is attached between both wooden and brick posts. Metal posts are also common, which is quite beneficial for the safety and reliability of the entire enclosure.
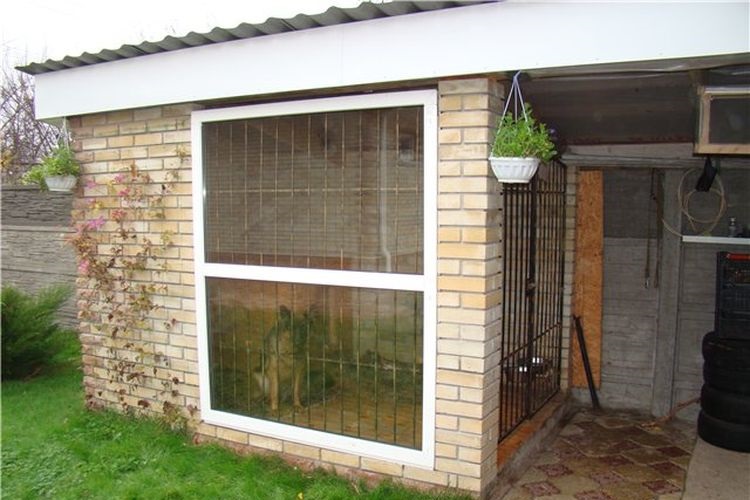
The use of brick, and in some cases natural stone, is driven by purely aesthetic and design considerations. When the property around the house is landscaped in a certain style, it makes sense to build a similar enclosure. Otherwise, the use of this material will depend solely on the taste and vision of the owner of the country house.
Concrete is primarily used to create the floor of the enclosure. However, wood also qualifies for this role, remaining a classic building material. Concrete is also used to build the foundation for the enclosure, so it shouldn't be discounted.
Wooden decking or concrete flooring
Choosing the right flooring for your enclosure is crucial. Concrete is the clear choice. This material eliminates the need to dig under the enclosure, protecting guests from the guard dog's sudden appearance. However, this method also has its downsides.
In winter, outdoor dog runs with concrete floors pose a hidden danger to pets. This is because the stone becomes extremely cold during freezing temperatures. This subzero temperature is then transferred to the dog's paws. Prolonged exposure to the cold from the concrete floor can lead to rheumatism in your four-legged friend.
Wood, on the other hand, is a more forgiving material. With its low thermal conductivity, it doesn't cause as much damage to dogs. However, it does have its weaknesses. For example, it doesn't resist the fungus and mold that grow on the flooring due to its close proximity to the ground. This can only be combated by using various impregnations and preservatives.
A dirt field is also worth mentioning. In this case, no flooring is installed, and the dog walks directly on the grass inside the enclosure. However, this method is fraught with problems associated with digging. Four-legged pets are excellent diggers. They will quickly crawl out and disturb everyone around them. That's why a flooring is essential.
Does the enclosure need a roof?
The answer to this question may again depend on the region where the country house is located. But one thing is certain: a dog needs protection not only from rain but also from the scorching sun. This means a roof is essential for the enclosure—at least over most of it.
The choice of material can be approached in the same way as roofing a house. You can install ondulin, soft shingles, or regular tiles. The choice depends entirely on the property owner's budget. The main rule is that the roof should be quiet. This is important for the dog's peace of mind. During rain, raindrops can pound loudly on the roof and irritate the animal, especially if the storm occurs at night.
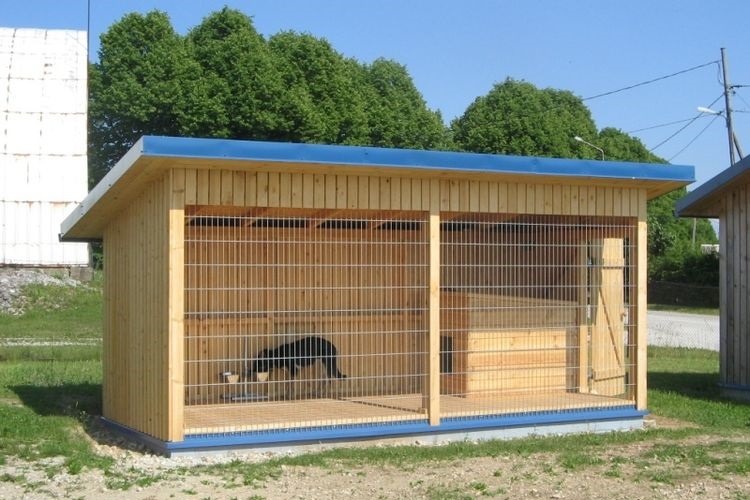
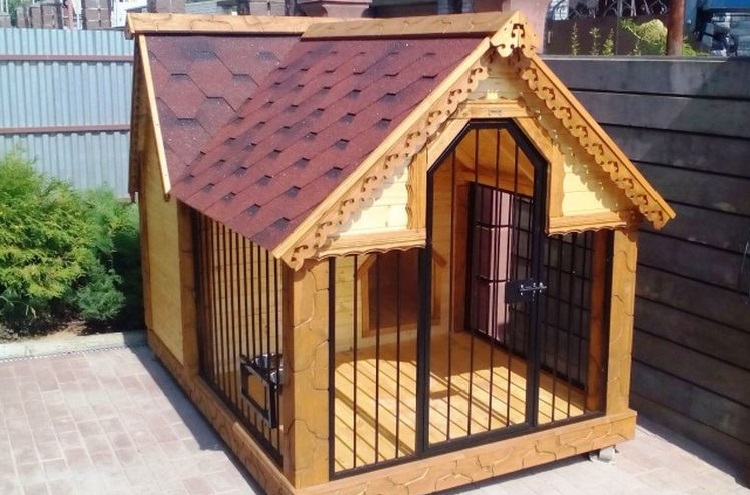
The roof design can also be left to the designer's discretion. Typically, single-pitched roofs are used, which are excellent at shedding rainfall. However, more complex designs are also possible, where the pet enclosure resembles a real house. Like this photo of a dog run.
The door is an element of special importance
Entry and exit are only possible through an opening. This opening must be built into the enclosure's structure. However, the entrance must not be left open, otherwise the dog will simply escape. Therefore, a door panel must be installed in the fence.
There's one rule for this design element. The door must open inward into the enclosure itself. This is a safety requirement that some pet owners violate. Furthermore, the door must have a secure lock. The entrance must be kept locked to prevent the pet from leaving its enclosure without its owner's knowledge.
The locking mechanism should be easy to close from both the outside and inside. This will allow the owner to easily exit the enclosure, even if the door closes. The handle is installed at the owner's discretion.
The door is constructed as a rectangular frame. The center of the door is reinforced with an additional spacer, which can be used to secure a lock. The door can be made of metal or wood. The choice depends on the overall design of the enclosure. Welded mesh is often used as a door, but this option is typically installed on the same enclosure.
Feeder device
To quickly and safely feed your four-legged friend, you'll need to install a feeding trough. This element needs to be considered before building a dog run. There are several feeding trough designs to choose from. But the best option is one that keeps your dog locked in and provides a bowl of food and water.
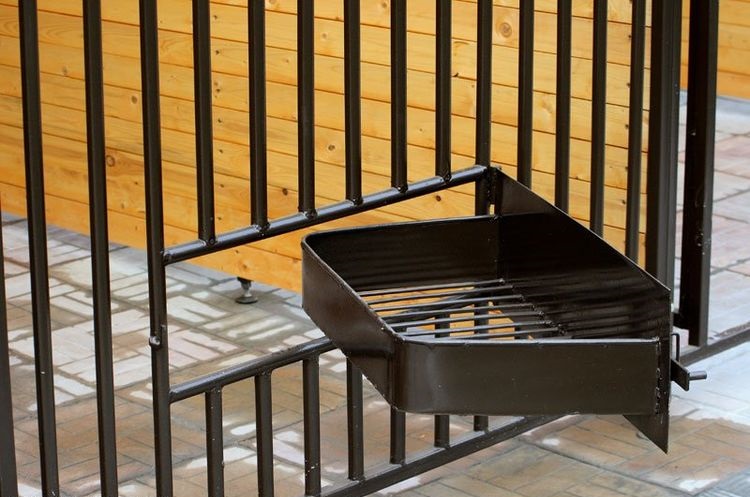
This device can be made not only with a lattice fence, but also using mesh. In this case, additional beams must be added to the wooden frame. This will create a small frame into which the feeder's rotating mechanism will be inserted.
If there are multiple dogs in the enclosure, the number of places for eating and drinking should increase accordingly. The main thing is to provide the pets with comfortable conditions, as well as the ability to quickly clean up the enclosure to keep it clean and dry.
Booth or winter house
Where should a four-legged friend rest, shelter from the cold in winter, and from heavy rains the rest of the time? A kennel, of course. This structure is familiar to many from childhood, when every private home always had a similar place for the dog. But if there are several dogs in the same enclosure, a single kennel won't be enough. It's best to build a small residential complex, which is called a winter house.
Typically, these structures have a separate entrance from the street, which the owners use for regular cleaning. A window can also be built into it to avoid the need for additional electrical wiring. And it goes without saying that such a room should be tall enough to allow people to work and move around without bending.
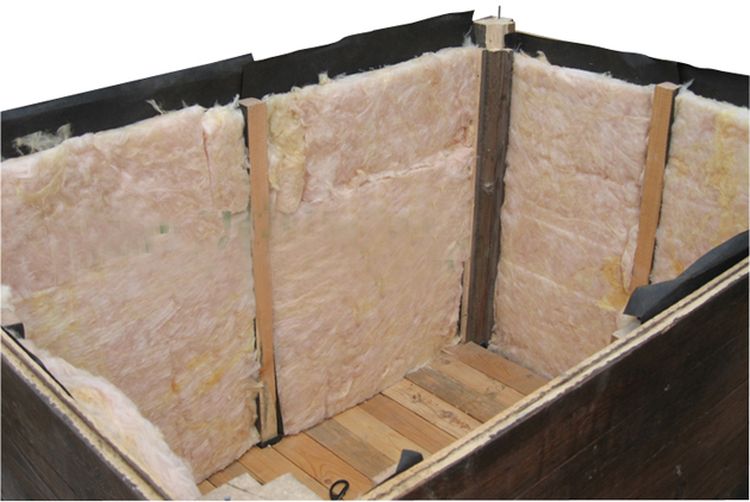
Both the winter road and the shelter must be well insulated. All work is carried out as in a regular residential building. When insulation If this is done, the owner will be completely confident that the dog will not freeze even in the most severe frost.
It's a good idea to build a platform on top of the kennel. This is essential for the dog itself, which prefers a good view of the surrounding area from a height. The platform also serves as the roof of the kennel and will also require a layer of insulation. Even better, build a folding bed. This will make cleaning the inside of the kennel easy.
The entrance to the kennel or winter shed is small. A 60x60 cm square is sufficient. The corners can be slightly rounded. A curtain is essential. This can be made from rubber strips, PVC, or simply burlap. This curtain will keep warm air in, keeping the dog comfortable on cold days.
Tools
When moving on to the practical part of building a pet enclosure, don't forget about tools. The following will be useful:
- Hacksaw or electric jigsaw.
- Tape measure and pencil.
- Bayonet and shovel.
- Screwdriver and screwdrivers.
- Hammer.
- Chisel or gouge.
- Grinding machine.
- Nippers.
- Brushes, roller.
Depending on the design (if a metal-mesh enclosure is chosen), an angle grinder and a welder may be useful. However, this is only necessary if the worker is proficient in these tools; otherwise, disaster could occur.
In addition to the listed equipment, don't forget about screws, nails, and paints and varnishes, which will be necessary to one degree or another during the work.
Earth, concrete and wood
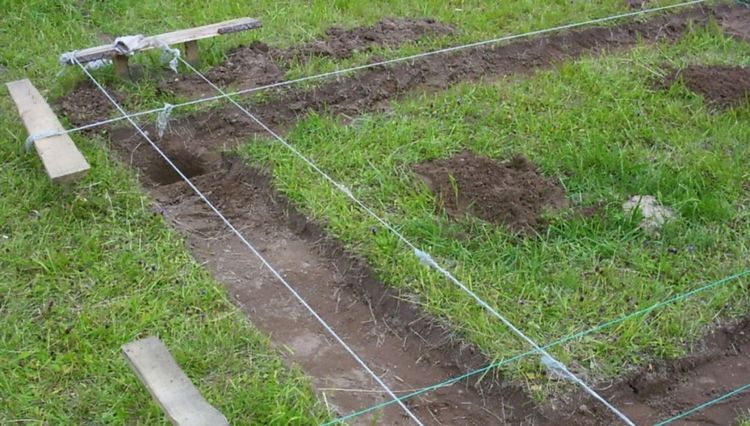
Before building a dog run yourself, you'll need to mark out the future structure. This will allow you to quickly and confidently move toward your goal.

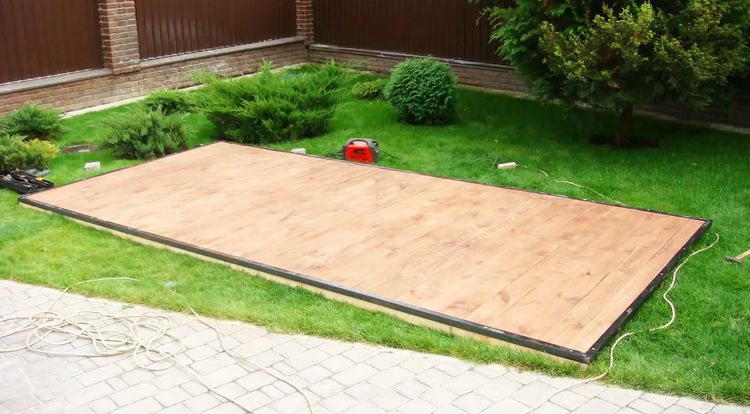
This is what a construction plan might look like. It's easier to mark out the foundation using stakes and string. Using this guide, you can begin excavation work. Don't dig too deep, as the structure won't bear much weight. A depth of 20 cm is sufficient to create a sand bed later.
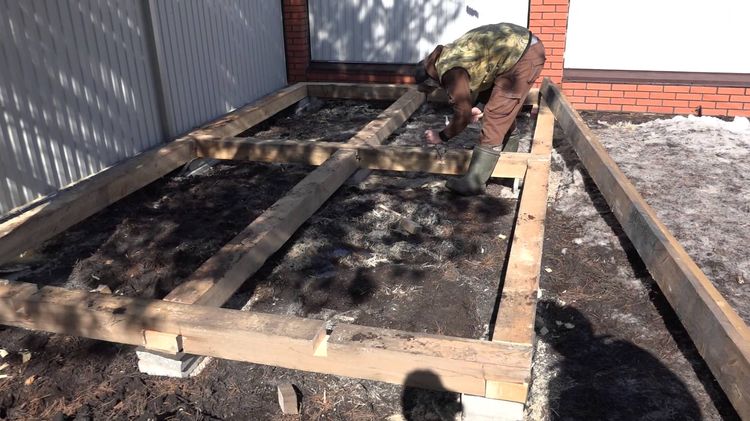
Next, concrete is poured or blocks are laid. The key is to create a stable foundation for the future enclosure. If metal mesh is chosen as the enclosure material, recesses must be made in the corners. The depth of these recesses should be at least 70 cm. While the concrete is pouring, metal pipe posts are inserted into the corners.
Flooring and frame
Once the enclosure foundation is ready, they begin constructing the frame and framing. If wood is chosen as the primary material, timber is laid around the perimeter. Joints at the corners and along the length can be made using "half timber" joints. In this case, the timber is sawn to half its thickness (if the total thickness is 100 mm, the cut will be 50 mm) and each piece is joined together.
Next, the frame of the future enclosure is installed. Templates are used for this, allowing for quick assembly of the entire enclosure. This allows for the frames to be pre-assembled and completed even by a single person.
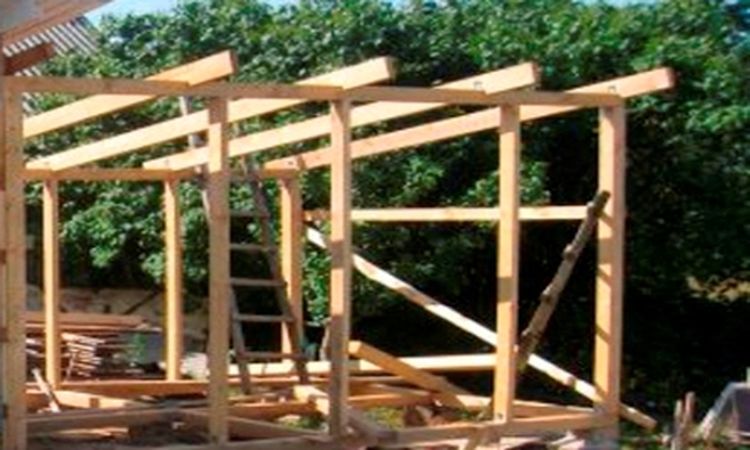
Perforated corners and self-tapping screws are used to secure the frame components. This creates a fairly strong "skeleton" for the future enclosure. In the part of the structure where the winter shelter will be located, the posts should be installed every 50 cm. It's a good idea to insert braces between them to strengthen the entire structure.
Read also on our website about: How to house train a dog and about that, How to make a dog bed with your own hands.
Roofing and insulation
Once the frame is in place, it's time to add the roof. The top of the enclosure is covered with rafters, to which the sheathing boards will later be nailed. The distance between the rafters depends on the cross-section of the material used. For boards 50 mm thick and 150 mm wide, a difference of 60 cm is optimal.
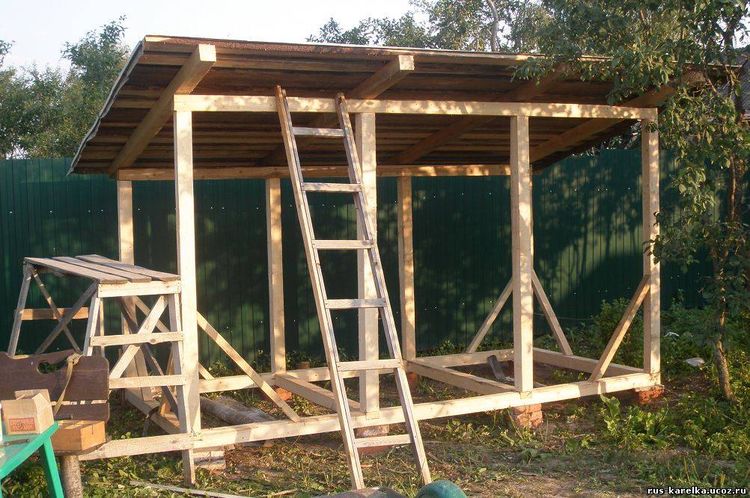
Next, the sheathing planks are nailed in place. 25x100 mm boards are used for these. The material must be edged, meaning the planks should not have any bark on the sides. Depending on the roofing type, the planks are nailed in place with or without spacing.
A windproof film should be installed over the frame studs, with insulation placed inside. Foam plastic, basalt wool, or similar materials should be used for the insulation. There should be no voids left when installing the insulation. This will prevent freezing.
Floor arrangement
Interior work begins with laying the floors in the enclosure. In a winter shed, they must be as well insulated as the walls and roof. However, a double layer of insulation is required on the floor. To prevent the insulation from sagging underneath, boards are nailed to the beams.
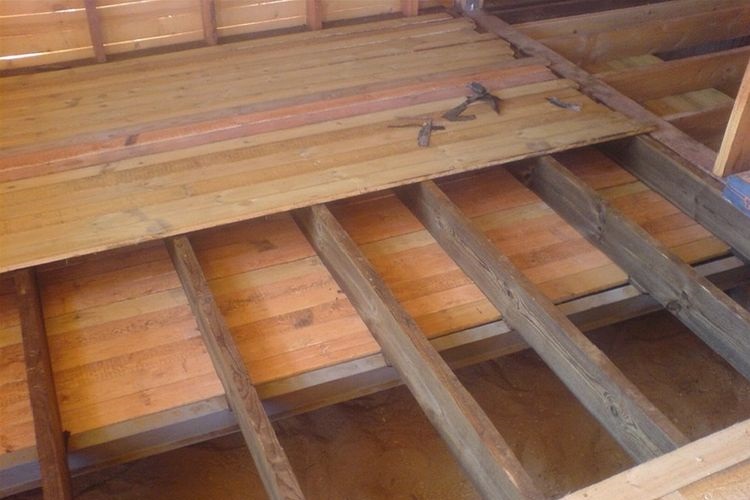
If you're using planks for your decking, it's a good idea to leave a gap around the edges. This will allow air to circulate and prevent mold and mildew from developing.
Winter road cladding with door and mesh installation
The enclosure is almost ready. All that's left is to polish it up. To do this, the winter enclosure needs to be covered, giving it an attractive appearance. For this, you'll need paneling. This material can be secured with nails or special clips.
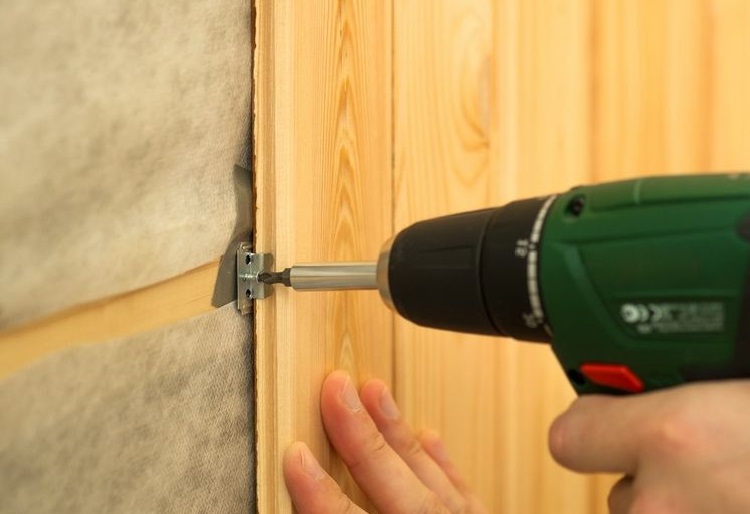
A cordless screwdriver will come in handy for this job. It allows for installation using screws, preventing damage to the paneling edges.
Installing the netting is also not difficult, and anyone can teach a master class using this material. Nails, staples, or self-tapping screws with a press washer are used for fastening. One condition must be met: the fastening must be secure enough so that the dog cannot tear it off.
The final step is installing the door. The door is attached using hinges and screws. Once everything is in place, a lock or bolt is installed on the door. The dog run is ready.

The feeder can be attached directly to the mesh or, if possible, between the posts. Now the pet has a place to live and eat. In turn, it will faithfully guard the owners' country mansion.
Read also:
- Dog enclosure
- How to build a dog house with your own hands?
- Beds and houses: the most unusual products for dogs


1 comment
Vladimir
Thank you very interesting and useful information.
Add a comment