
DIY felt dog
As the New Year holidays approach, choosing a themed gift for family and friends becomes a top priority. On such a magical holiday, you want to choose something special that will evoke warm feelings in the recipient. Handmade gifts, such as a felt dog—the patron saint of the coming year—can be a surefire option.
Content
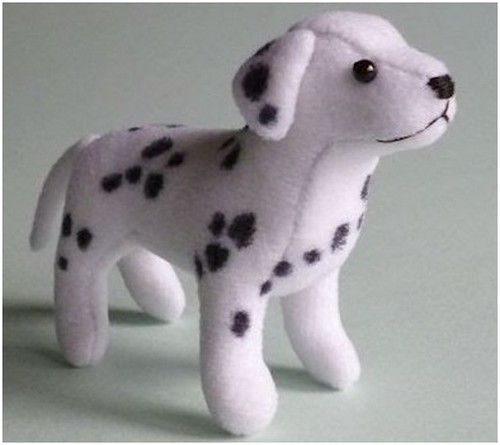
Making a Dalmatian toy
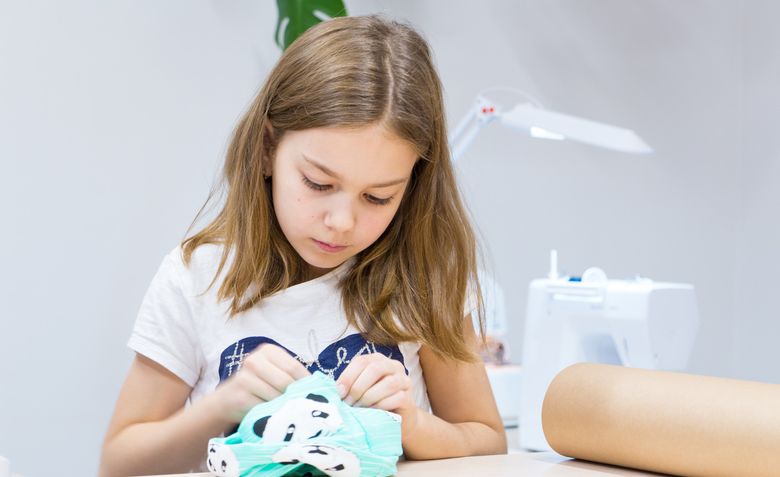
Soft toys are among the most popular. Children love to play with them, tuck them into bed, and take them on trips. They'll be delighted to add a cute patroness of the coming year to their collection. A small felt dog, lovingly crafted by a loved one, will brighten up a child's loneliness during the time away from adults.
Making a felt dog yourself is a wonderful way to spend time with younger family members. Children enjoy helping prepare gifts and surprises for loved ones.
What you will need for sewing
Dalmatians are spotted four-legged creatures that evoke so much affection. We suggest making one of this family's representatives. Sewing a felt dog using this pattern will take 1-2 hours, but the result will surely delight its owner for days to come.
White felt will be used as the base for sewing the toy. It's easy to work with and doesn't require finishing the edges, as it doesn't fray easily. When making a felt dog pattern, it's best to use sheets of 10-15 mm thick made of synthetic fibers mixed with viscose or acrylic. This material has a soft, flexible texture, resulting in neat and presentable toys.
The main decoration of this breed is the spots, which are easy to draw with a regular marker.
To sew a souvenir you will also need:
- holofiber or synthetic fluff;
- thin needles for hand sewing;
- small scissors and large ones for cutting;
- gel pen or marker;
- black and white threads;
- black buttons or beads.
If desired, the fibrous synthetic fluff can be replaced with thin foam rubber or synthetic batting. Just avoid using cotton wool or batting for this purpose. They will come out through the seam holes and, with heavy use, will clump together.
Creating a toy pattern
The first step in making a felt dog is to print out the template. Use the pattern as a guide, as it clearly shows all the components of the figure you're creating.
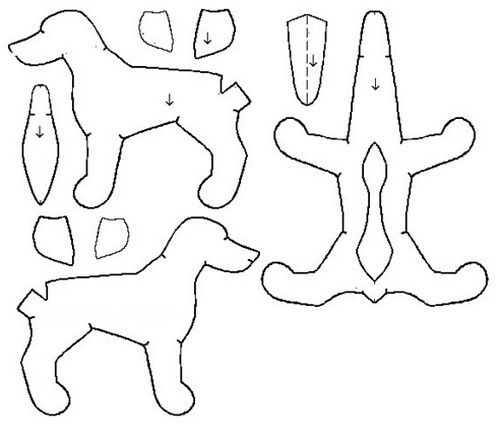
To transfer the template to the fabric, place the pattern pieces on the wrong side of the fabric and pin them in place. Trace around each piece, remembering to leave 3-5 mm seam allowances.
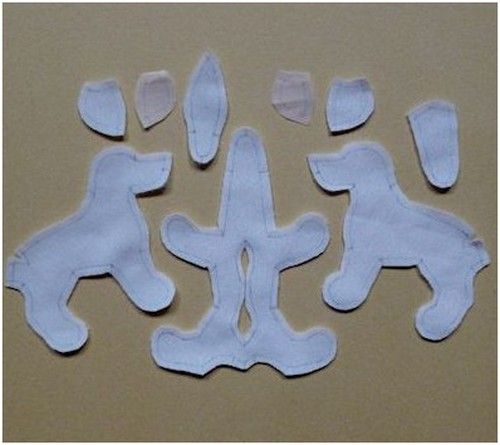
Assembling the Dalmatian parts
First, join the two side pieces together by making a couple of stitches along the front side.
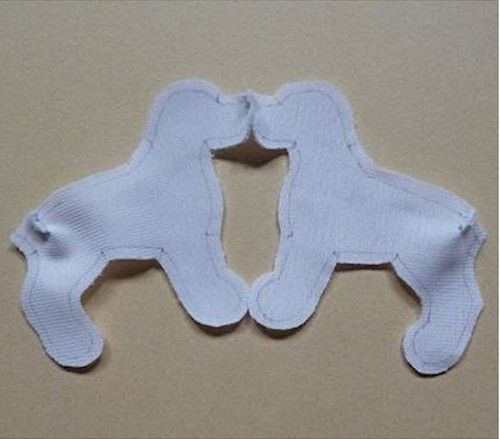
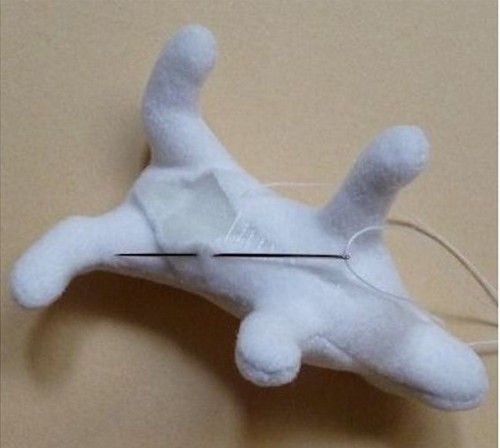
Assemble the remaining pieces by turning them inside out. Sew along the marked line of the animal's head. Then, sew the two side body pieces along the line along the spine on the back.
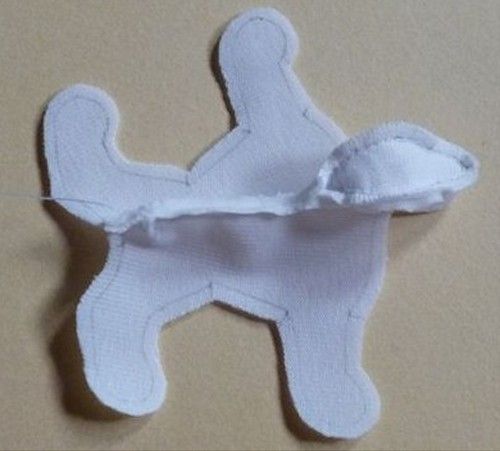
Sew the belly piece to the sides of the figurine along the inner lines of the paws. It has a hole in the center for stuffing the finished toy.
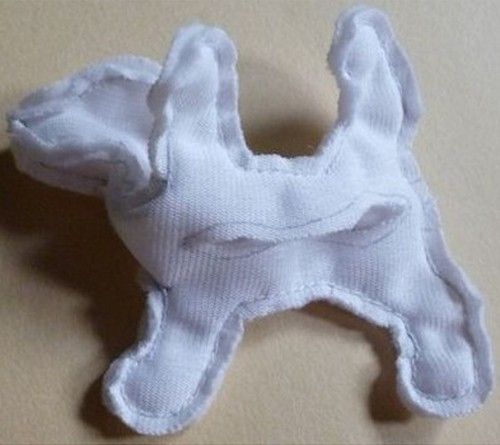
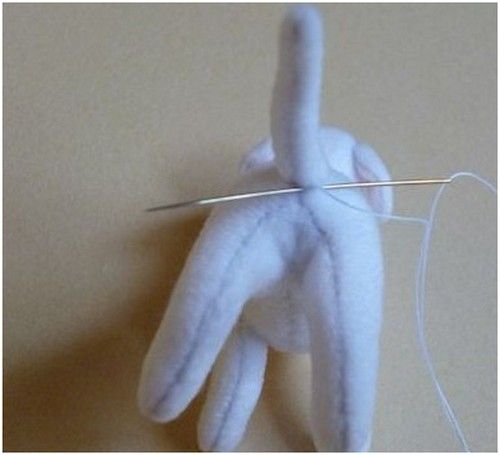
Turn the figurine right side out. Straighten and adjust the seams if necessary.
We stuff the hole in the center of the tummy with holofiber, giving the figurine the desired shape. Once the toy has gained volume, we sew the hole closed with a blind stitch.
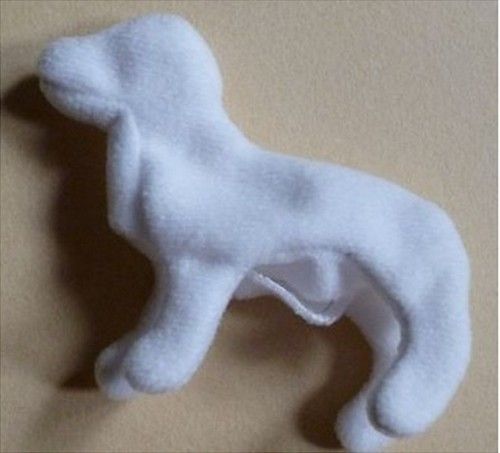
Decorating a Dalmatian
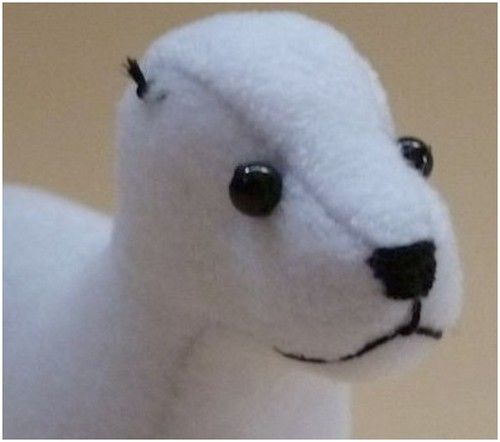
Shape the animal's mouth using a buttonhole stitch. Form the nose with a few stitches, giving it a triangular shape.
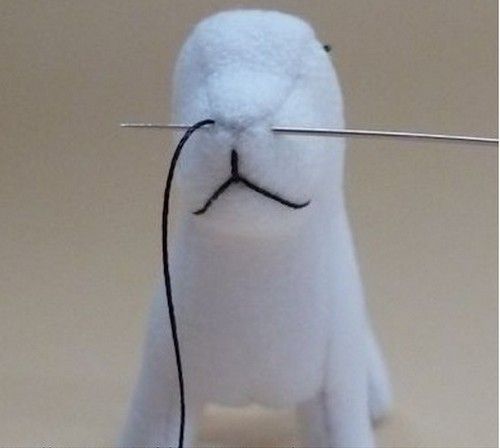
Black beads will serve as eyes.
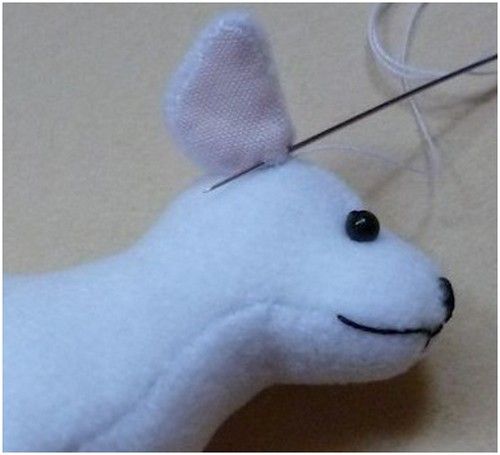
To make the ears, sew the pieces together from the back. Turn them right side out and sew them to the head at an equal distance from the crown.

We sew the animal's tail using the same principle. Fill it with holofiber and sew it to the body.
The final and most exciting part is coloring the animal. All you need to do is scatter black spots across the body. To do this, use a black marker to apply a couple dozen spots of different shapes and sizes.
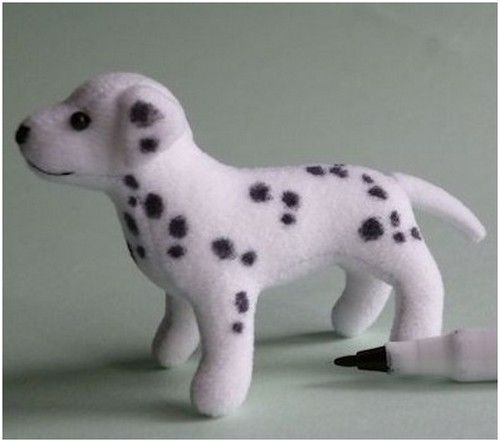
To prevent the toy from appearing too colorful, leave the animal's hind legs and face unpainted.
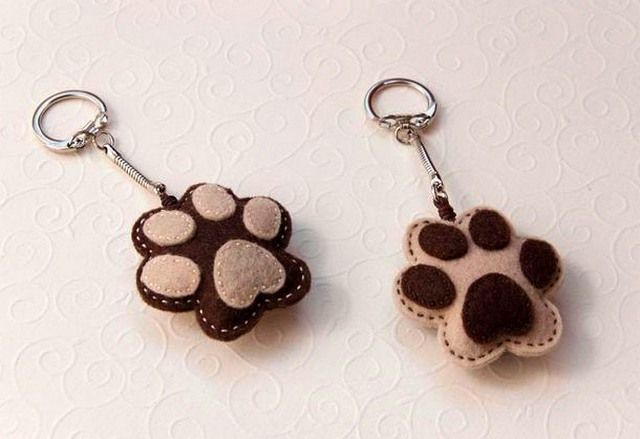
Felt dog paw
Not ready to tackle sewing a whole dog? Why not make a simple themed souvenir in the shape of a paw? These cute and soft dog paws will make a wonderful decoration for this pine beauty. If desired, you can attach a carabiner or a metal key ring to the craft, turning it into a unique keychain.
Making this felt craft couldn't be easier. Even a small child can do it with adult guidance.
Necessary materials
To create a chubby paw, you will need the following materials and tools:
- pieces of fabric in two contrasting shades
- threads of corresponding colors;
- paper and thick cardboard;
- white chalk or marker;
- scissors;
- glue;
- filler.
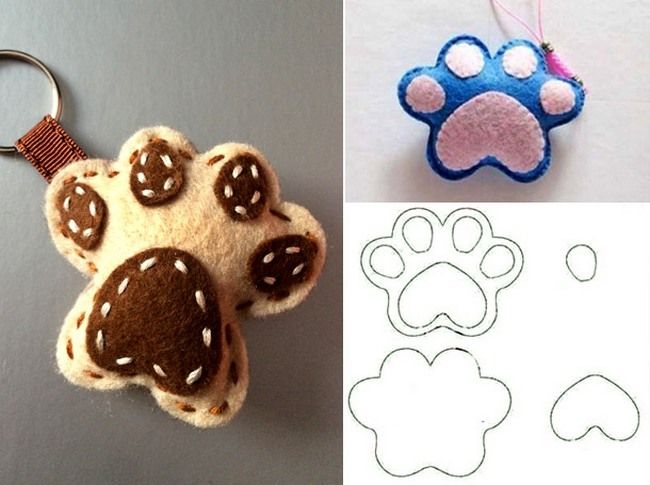
Ribbons, ropes, rings, and carabiners are convenient for fastenings and hanging elements. Use this paper pattern as a template for making a felt dog paw. Download it and print it on a regular sheet of paper.
Six simple steps
To make an original craft, you only need to follow six simple steps:
- Transfer the printed pattern to cardboard. Carefully cut out the shapes of the paws, heels, and toe pads along the marked outline.
- Place a rigid presser foot template on the selected piece of fabric. Trace around each template and cut it out. You'll need a pair of these to make one presser foot.
- Place the cardboard templates for the heel and toe pads on another piece of fabric in a contrasting color. Each piece should be a unique design.
- Place contrasting pieces on the foot according to the pattern. The heels and toe pads can be glued or sewn on. If you choose the first option, be prepared for them to fall off over time with wear.
- Place both pieces right sides together. Sew along the outline with contrasting thread, remembering to leave a small opening for stuffing.
- Fill the foot with synthetic fluff. Insert the ends of the ribbon, folded into a loop, into the resulting pocket and secure them with thread, bringing the end of the seam to its starting point.
The size of the loop depends on the intended use of the souvenir. If you're making it a Christmas tree ornament, make the loop longer. If you're making a keychain, a small loop into which a metal carabiner will be inserted will suffice.
Felt magnet "Chihuahua"
Continuing on this topic, we offer another interesting idea for making a simple felt dog craft. A miniature magnet in the shape of a cute, popular dog breed makes a great gift. Friends with pets will appreciate such a present.
Preparation of materials
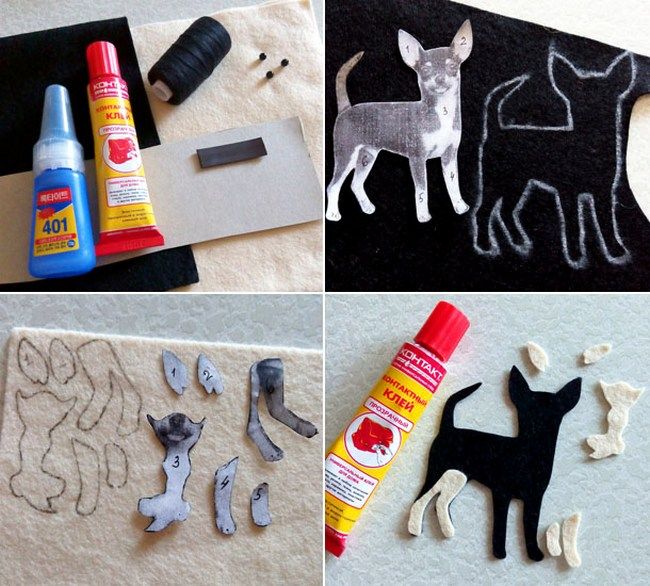
To make the magnet a miniature replica of the "furry original," prepare a photo of a dog of your chosen breed in advance. In our example, it's a Chihuahua.
To create a handmade magnet you will need:
- pieces of fabric in different shades;
- three beads;
- a piece of thick cardboard;
- flat magnet;
- marker or chalk;
- a piece of plywood;
- stationery knife;
- scissors.
PVA glue or any fabric glue is convenient for gluing the pieces together. When using Moment glue, be careful not to let the adhesive bleed through the fabric. Otherwise, after it dries, a permanent white stain will remain on the front of the fabric.
The main stages of production
Once you've selected a suitable photo of your dog, print two copies. You'll need to resize it to fit the magnet's dimensions. Ideally, the image should be between 9-11 cm. This ensures a neat, clean look while still allowing even the finest details to be clearly visible.
The technology for creating a dog magnet includes a number of basic steps:
- Print out the image templates on a sheet of paper and determine which parts of the dog's body will have polarizing shades. In our version, the white paws, chest, and muzzle with protruding ears will contrast well against the black background.
- On one of the printed drawings, number all the body parts, then cut it into separate pieces.
- Place the entire dog silhouette on a piece of black fabric and trace around the outline. Make two identical pieces.
- Lay the templates for the light-colored pieces on a piece of white fabric and trace around the outline. Make only one copy of each piece.
- Take a large animal figure and, according to the image, place the light-colored parts on it: the paws, chest, muzzle, and ears. After checking the placement and size, glue each part in place, one at a time.
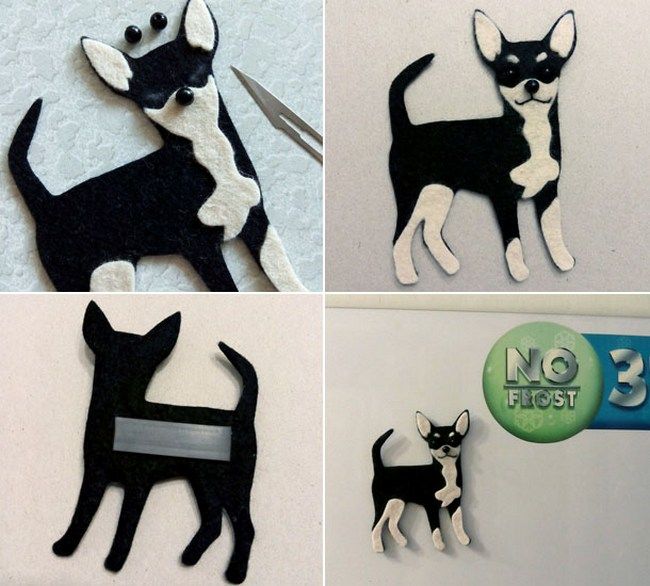
- On the animal's face, mark the spots where the eyes will be. To create the eyelids, use a craft knife to make neat slits in these spots. To create expressive eyes, sew beads to square black blanks and insert them into the slits.
- Sew a plastic bead-shaped nose onto the tip of the muzzle. Embroider the mouth strip with black thread. Frame the eyes with white eyebrows cut from strips of white felt.
- To give the souvenir rigidity, place the formed animal silhouette on a sheet of thick cardboard and trace the outline with a pencil. To prevent the cardboard base from protruding beyond the felt shape, leave a few millimeters toward the center when cutting out the piece.
- We assemble three identical parts of the figure, placing the cardboard one between two felt ones. Glue all the parts together. Place a magnet on the back of the souvenir.
Tip: When creating templates from light-colored fabric, it's best to place the templates face down on the fabric. This will prevent markings from appearing on the image when tracing the outline.
Using the same principle, you can create a magnet in the shape of a four-legged friend of any breed – a Yorkie, a Liverpool, a spaniel, a pug, a dachshund… We're sure this miniature version of your furry family member will surely delight everyone in your household.
Read also:


Add a comment