
How to properly trim your dog's nails at home
Dogs' nails wear down partially naturally on asphalt and other hard surfaces. However, many pets don't go for long walks, and in winter, the ground is covered with snow, so dewclaws don't wear down on their own. Therefore, owners need to trim their dogs' nails regularly.
To avoid causing pain or harm to your pet, it is important to know how to properly perform this procedure at home.
Content
Basic rules
It's best to acclimate a dog to nail trimming from puppyhood—this way, they'll get used to it faster and tolerate the procedure well. However, if you're trimming an adult dog's nails for the first time, difficulties may arise: the animal may struggle and whine due to fear and the unfamiliar sensation.
There are some rules for trimming your dog's nails to reduce discomfort:
- You need to carefully examine the dog's paws; if there is hair growing between the toes, it should be trimmed first. with scissors With rounded tips to allow access to the nails. These excess hairs also act as a dirt trap, so removing them from the paw pads will reduce the risk of infection.
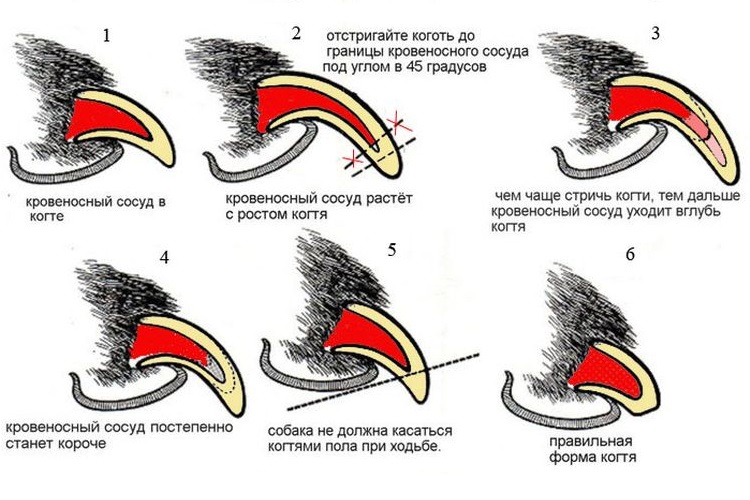
- A dog's nail consists of two parts: a tough outer sheath and an inner, sensitive pulp, which contains blood vessels and nerve endings. Damaging the pulp will cause bleeding. Therefore, it's important to carefully examine the location of the sensitive area to avoid causing pain. The location of the pulp is much more visible on white, translucent nails; in the case of black nails, a visit to the veterinarian may be necessary for the initial procedure.
- It will be easier to trim the hard part of the nail if you do the trimming immediately after washing the paws.
- The owner must remain calm and speak to the animal affectionately.
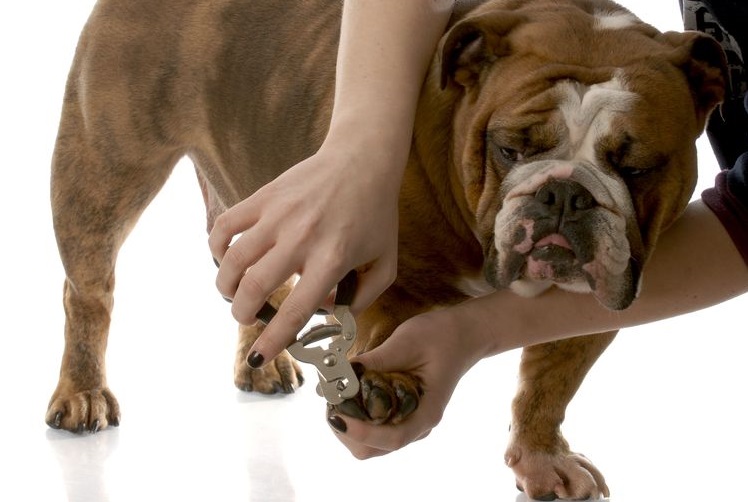
- The procedure is easier if the dog is lying on an elevated surface. If the animal is on the floor, you may need an assistant to hold it firmly around the neck and support its paw. Pet owners sometimes have difficulty trimming their dog's hind paw nails. To do this, lay the animal on its side and apply pressure to the toe pads to make the nails easier to reach.
During the procedure, you should carefully examine the dog's paws. If cracks, calluses, or minor damage are detected, hygienic treatment of the damaged surfaces should be carried out.
Read also on our website about: How to hold a dog when trimming its nails.
The importance of the process
A dog's long nails can grow into the skin, causing pain and wounds. Such injuries pose a potential danger, as there's a risk of infection during a walk and subsequent paw infection.
Excessively long nails often break and affect a dog's gait. A dog with long nails is forced to position its paws crookedly, which affects the condition of the joints and ligaments. The most dangerous consequences of untimely nail trimming are blood poisoning and skeletal deformities.
But a pet's long claws also pose a danger to its owner. A dog can inadvertently injure a person or damage furniture or carpeting. Therefore, as soon as you hear the clicking of paws while your dog is moving around the house, it's time to clean it.
How often should a dog's nails be trimmed at home? Adult dogs should be trimmed every 4 weeks, while puppies can be trimmed every 6 weeks.
What to do if your dog won't let you trim its nails?
You should start accustoming your dog to having its nails trimmed as a puppy—around two months old. This should be done regularly, calmly, and patiently, rewarding your pet with treats. Initially, it's important to simply accustom your puppy to having its paws touched, without jumping straight to trimming.
Once your dog begins to yield to its paws, you can try trimming its nails. If resistance occurs, return to the previous step. Praise and reward your pet for each nail trimmed. If pain is caused during the procedure, it's best to stop trimming and continue another day. This approach is also suitable for adult dogs.
If persuasion doesn't work, you can use a grinder—it gently files down the nail layer by layer and allows you to control the depth of the treatment. In the most difficult cases, it's best to consult a veterinarian or groomer, who are skilled at working with even the most stubborn animals.
Tools
To properly trim your dog's nails, you need to prepare the necessary tools and supplies in advance. The kit should include the following items:
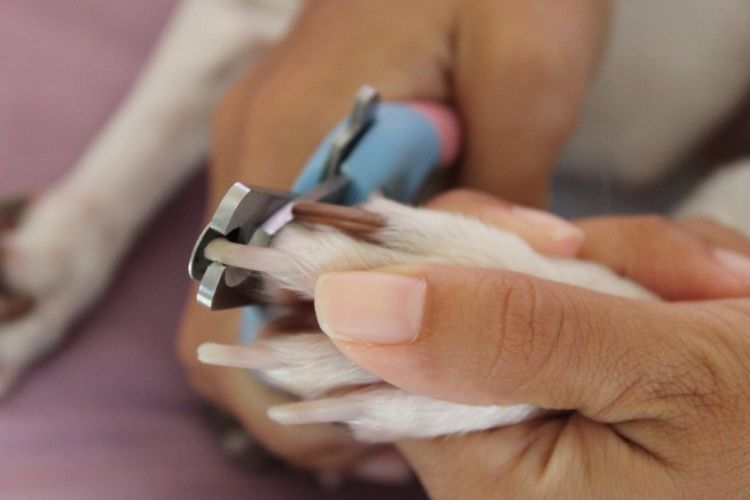
- Nail clippersDon't use regular scissors, as they can damage the nail plate. It's best to purchase a special tool, which is available at pet stores. There are two types of nail clippers: the former resemble nippers with sharp blades, while the latter resemble guillotines with holes into which the nail is inserted. For large breed dogs with hard nail plates, it's best to choose a nipper-style nail clipper; otherwise, you can use any tool you prefer.
- Nail file.
- Hemostatic agents - baby powder or flour.
- Antiseptic – iodine, peroxide, potassium permanganate.
- Cotton pads for treating wounds.
The owner should prepare the dog's favorite treat in advance. This will help distract the animal during the procedure and serve as a pleasant reward upon completion.
An important point is to be patient and choose the best time for grooming. Ideally, your dog will have just finished eating or returned home after a long walk. In this state, he won't be able to actively resist your actions.
Stages of the procedure
To properly trim your dog's nails, follow these instructions:
- Carefully inspect your pet's nails and determine the cut location. Ideally, the distance to the pulp should be at least 2 mm.
- If the beginning of the sensitive area is not visible, you should start trimming the nail plate from the very tip.
- Take the dog's paw in your hand and securely hold it.
- Position the nail clipper at a 45 degree angle and carefully make the cut.
- File your nails to a smooth surface to prevent them from splitting.
- Praise and reward your pet with a treat.
Some animals have difficulty remaining still for long periods of time. In these cases, your pet will need a break to recuperate. With each session, you'll be able to trim more nails, and eventually, you can do the entire procedure in one session.
Wound treatment
If you accidentally touch the pulp and bleeding begins, you should calm the animal and then treat the wound:
- Wash the damaged area with hydrogen peroxide or iodine.
- Apply a weak solution of potassium permanganate to a cotton pad or piece of gauze and apply to the wound. Leave it on for at least a minute.
- Press the powder to the tip of the nail and hold until the bleeding stops completely.
It is advisable not to let the dog near water on this day, so that it does not introduce an infection into the fresh wound.
Regular nail trimming gradually reduces the pulp, making the process easier and reducing the risk of injury to the pet. Sometimes, the pet is given a sedative before the procedure or in cases of severe damage to sensitive tissue. Such medications should be prescribed by a veterinarian.
Read also:


Add a comment