
How to draw a dog step by step
We've already learned how to draw a cat, now let's look at how to draw a dog step by step. This animal can be depicted in several ways: a simple cartoonish sketch for those who skipped art classes in school, or a more complex and detailed pencil drawing of a dog. Thanks to the detailed step-by-step instructions, anyone can easily handle this task. The key is a little patience, perseverance, and a good mood.
For the drawings you will need: a set of pencils (2M, M, TM, T, 2T), an eraser, a sharpener, sheets of paper.
Content
How to draw a dog step by step with a pencil for kids
Young children struggle with complex lines, so we've found some easy and fun dog drawings. These are the simplest and most easy-to-create drawings, so any child can create them.
cartoon character
Many children have favorite cartoon dog characters. Balto, Dalmatians, Walt Disney's Goofy, characters from "Lady and the Tramp," and Bolt—this is just a few of the cute and funny dogs beloved by children and adults. We suggest drawing Baby from the animated series "The Barboskins"—the youngest of the "dog family," a sensible, obedient, yet playful, imaginative puppy—and the funny bulldog from the animated series "Tom and Jerry."
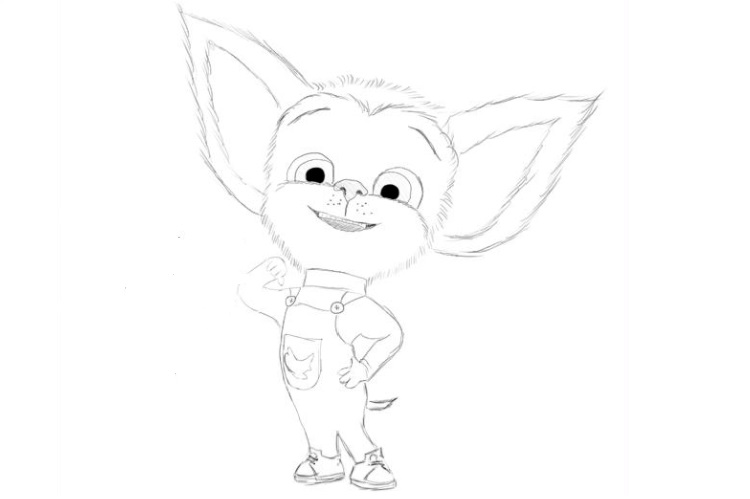
Baby Barboskin
Using a hard pencil, draw two circles. The first, larger one, is the puppy's head, and the second, smaller one will be the puppy's belly. Mark where the ears will be.
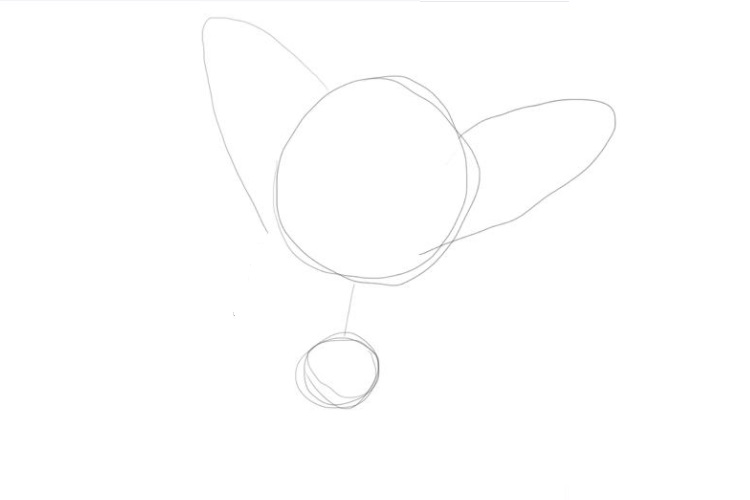
We mark the body and paws with straight lines.
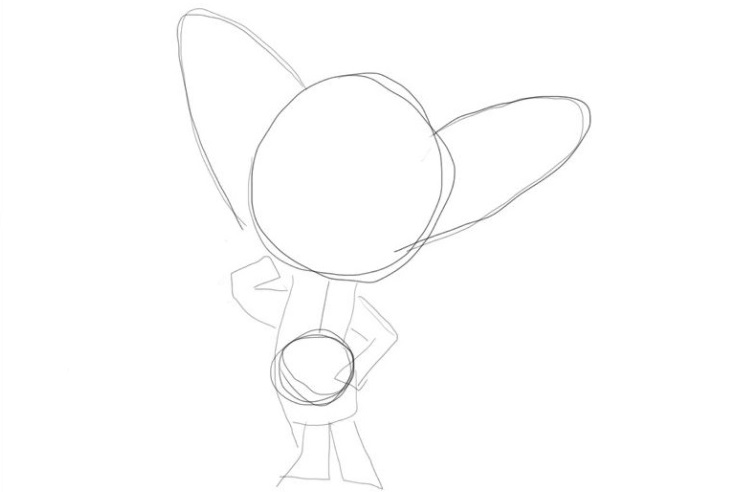
Using fine shading, outline the muzzle. Note the symmetry of the features. Outline the eyes, nose, mouth, and eyebrows. Draw the pointed ears. Then, using the markings made in the previous step as a guide, draw the paws and body with soft lines. Erase the markings and any unnecessary lines with an eraser.
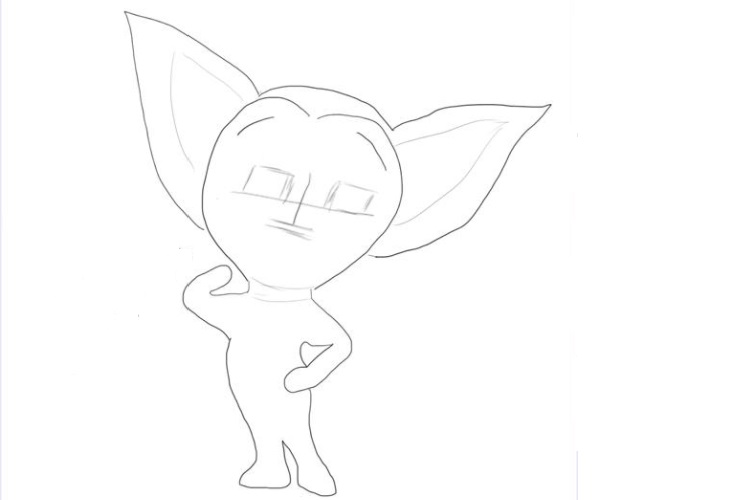
Let's go into detail face Baby. Let's draw a jumpsuit and applique on it. We mark the collar, the toes on the front paws, and the sneakers on the back paws.
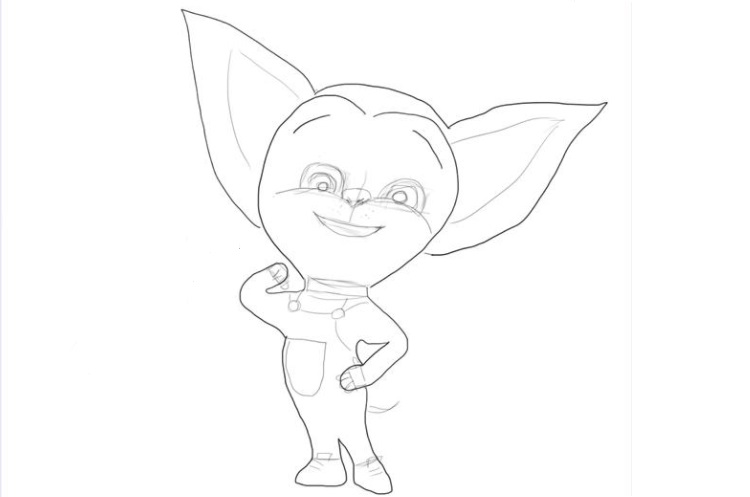
In the final stage, we use a soft pencil to create the fur and define the facial features. We draw the pupils and teeth, and detail the clothing (add buttons to the straps, a front pocket, and shoes). We also finish drawing the tail.
Baby Barboskin is ready.
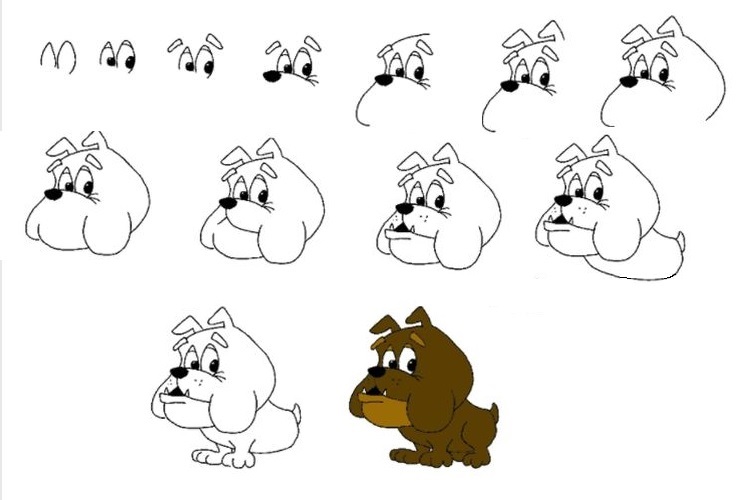
The toothy bulldog from Tom and Jerry
In real life, a bulldog might not be the friendliest breed. But in the cartoon, they're a very funny and playful dog. Thanks to this step-by-step tutorial, you can easily draw such a curious pet. The main thing is to maintain the proportions and follow the steps.
Funny dog coloring page
If your child asks you to draw a dog, don't be at a loss. Try drawing a simple and cute one. coloring bookAfterwards, you and your child can color the dog using bright markers, colored pencils, or paints.
A dog drawing begins with the face. To do this, draw an oval above the middle of the sheet (Figure 1). Then add the head and ears (Figure 2). Now it's time to draw the dog's paws. Note that the paws widen and become thicker toward the bottom.
Draw the paws. Ask your child to participate and draw three short lines – the animal's toes (Figure 3). Then add two semicircles. These will be the hind legs (Figure 4).
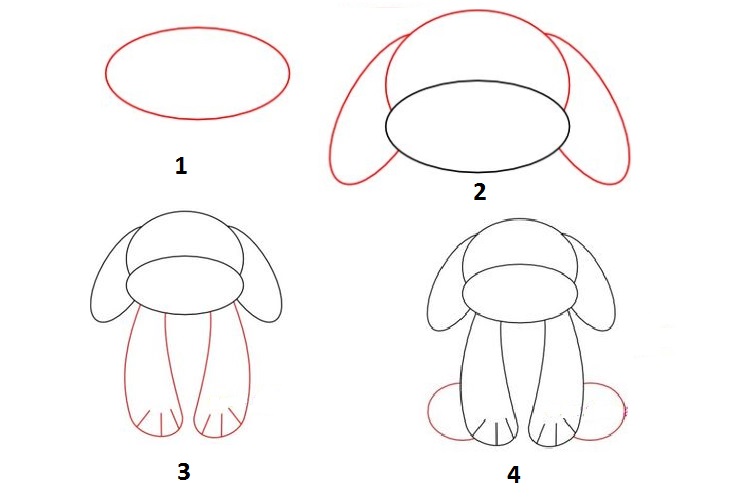
Connect the front legs with a short line, completing the body. Add a short tail. The animal's silhouette is complete (Figure 5).
Let's move on to the muzzle. Sketch out the oval eyes, nose, and sweet smile. Add two curved lines for the puppy's eyebrows (Figure 6).
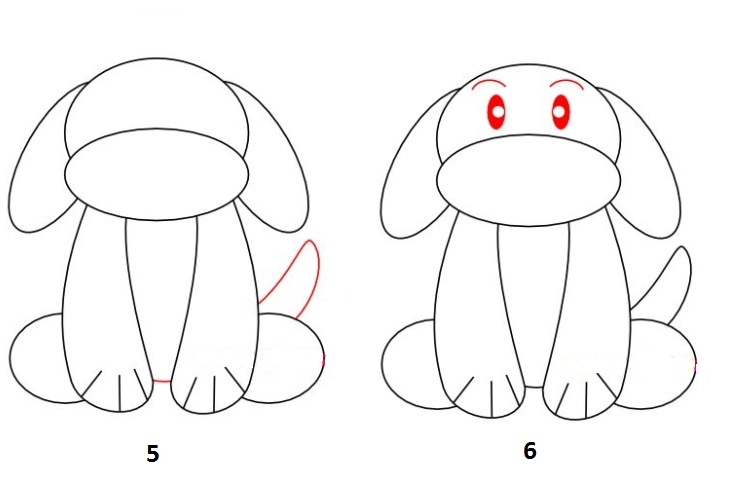
Important! Don't fill in the eyes completely. Leave two white, unshaded circles. These will be the pupils.
Let's draw the nose in more detail. Here, too, we should leave a spot of light unpainted. This will add life to the dog. The coloring dog is ready.

How to draw a playful dog
This image can be created very quickly. The sketch is simple, so some of the "work" can be entrusted to a young artist.
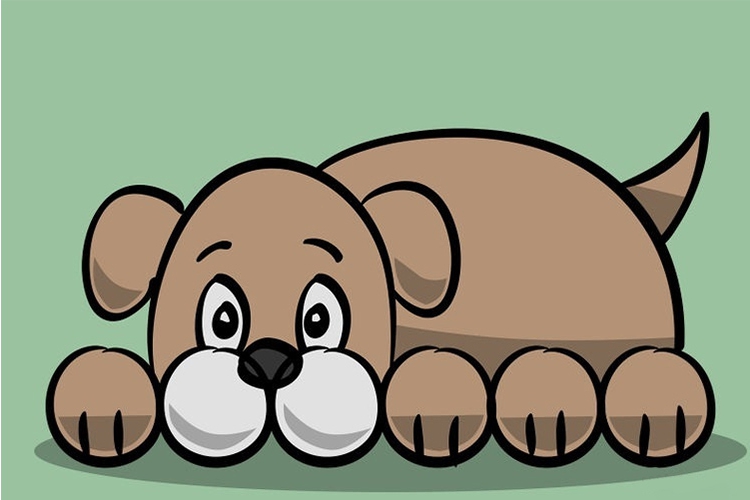
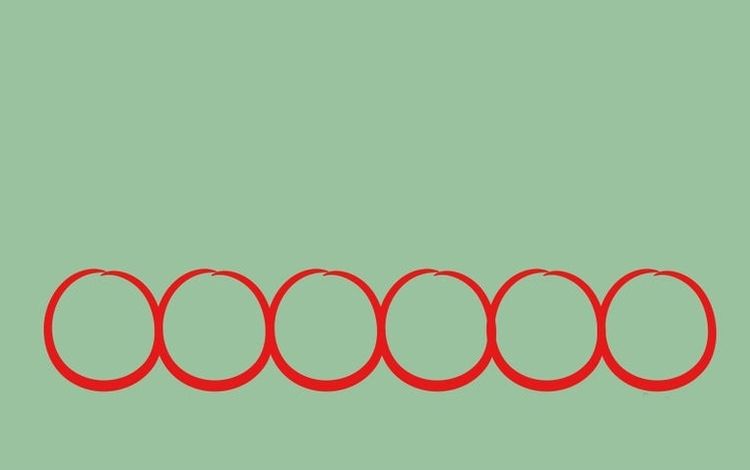
Step 1: Place the sheet diagonally and draw 6 identical circles at the bottom.
Step 2: Mark circles 1, 4, 5, and 6 for your child and ask them to draw two short parallel lines in each. The lines should be centered. These will be the dog's paws.

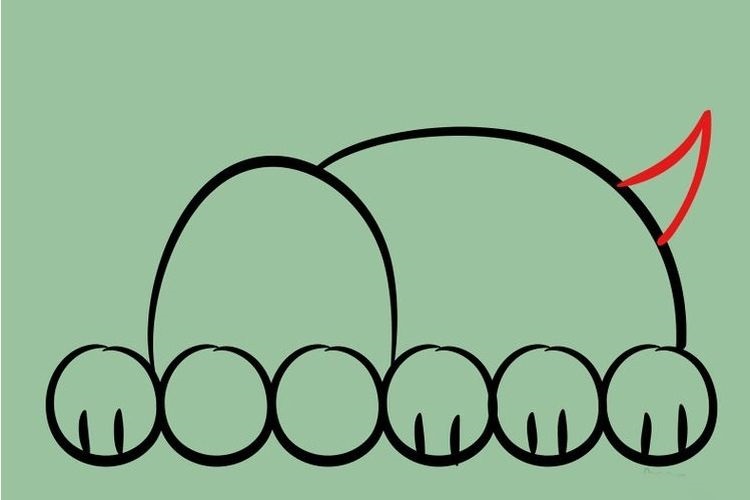
Step 3: Draw the animal's head in the shape of a semi-oval above circles #2 and #3.
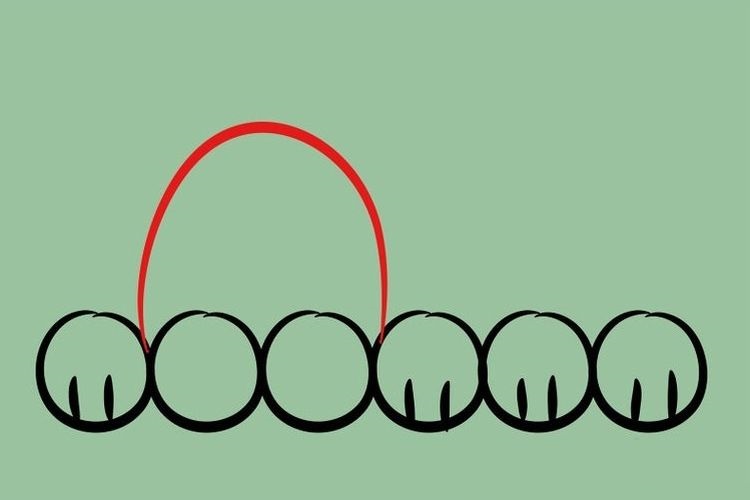
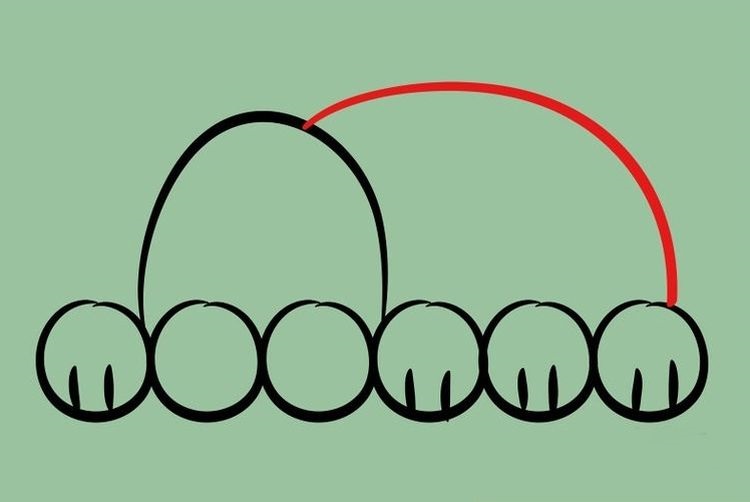
Step 4: Connect the head to the last leg with an arched line. This will be the body.
Step 5: Draw the tail. It can be long and shaggy, or short and perky, as in our drawing.
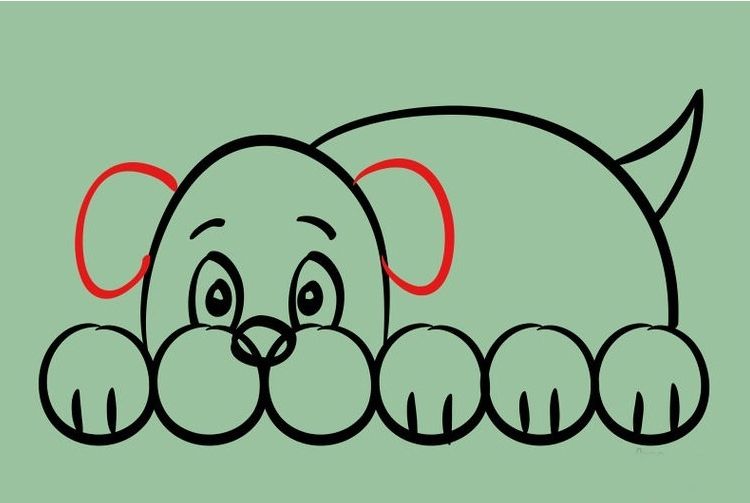
The final step is drawing the muzzle. A round nose, eyes with pupils, eyebrows, and ears. The curious puppy is ready. All that's left is to color the drawing.
Realistic images
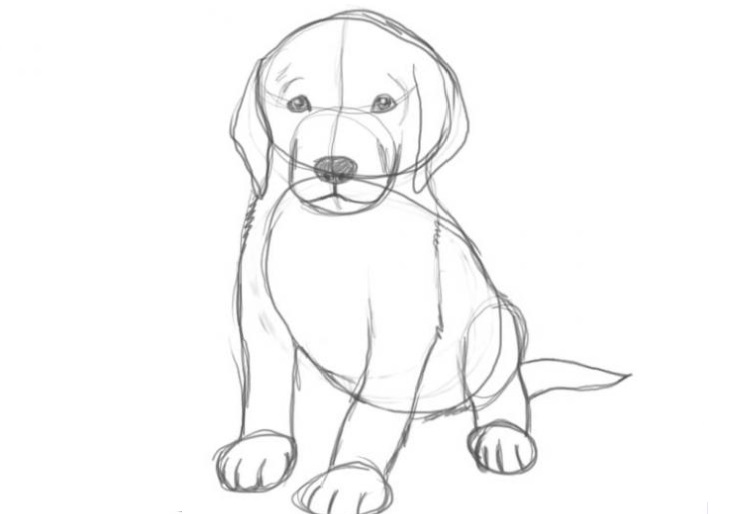
In this next master class, we'll learn how to draw a dog step by step with a pencil. Be patient, it might take a while.
Step 1. Using thin, light lines, without pressing the pencil lead into the paper, draw two ovals. These will be the head and body. Where the ovals meet, draw a small circle to mark the future muzzle. Add lines to define the paws.
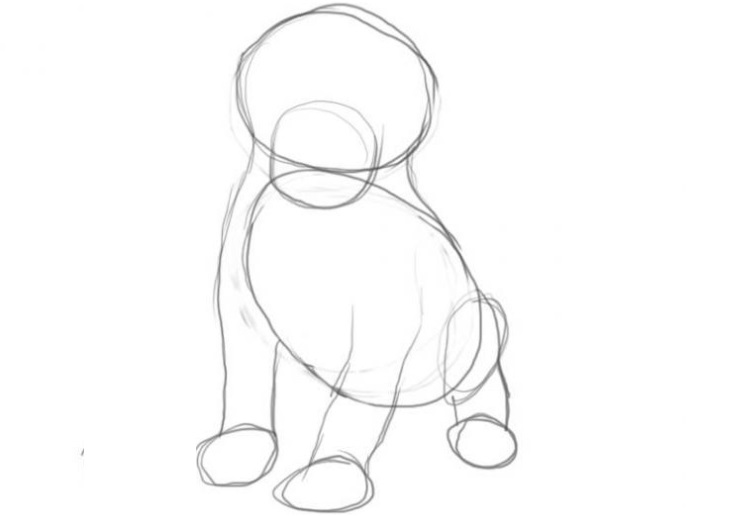
Step 2. This is the most difficult part of the entire drawing, as it involves drawing the animal's head and muzzle. Several very important rules apply here, which determine the success of your "masterpiece":
- The head should be proportionate to the body size, not too large or too small.
- It is important to generally maintain the proportions of body parts.
When drawing the eyes, note that they are usually round. The shape of the pupils (dilated, constricted) and their placement will determine the dog's overall mood. A dog can express any emotion: angry, cunning, aggressive, sad, curious, and so on.
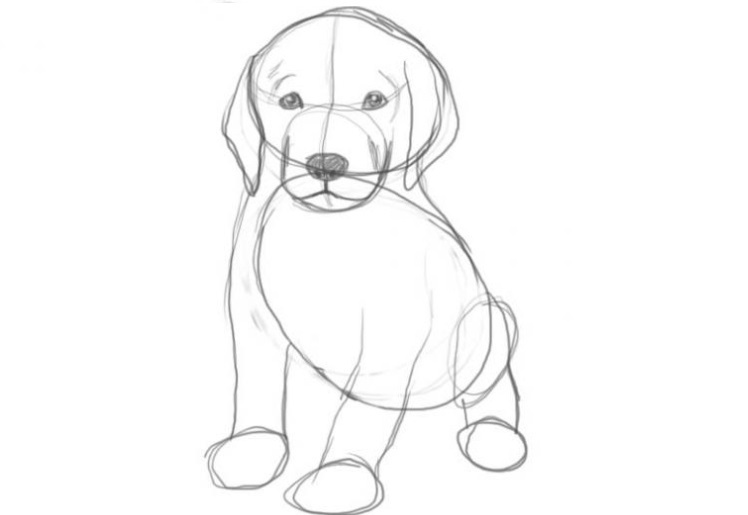
Step 3. Using a soft pencil (2M), draw the outline of the body with a thick line. Draw the paw pads and claws. Don't forget to add the tail.
Step 4. Erase the excess.
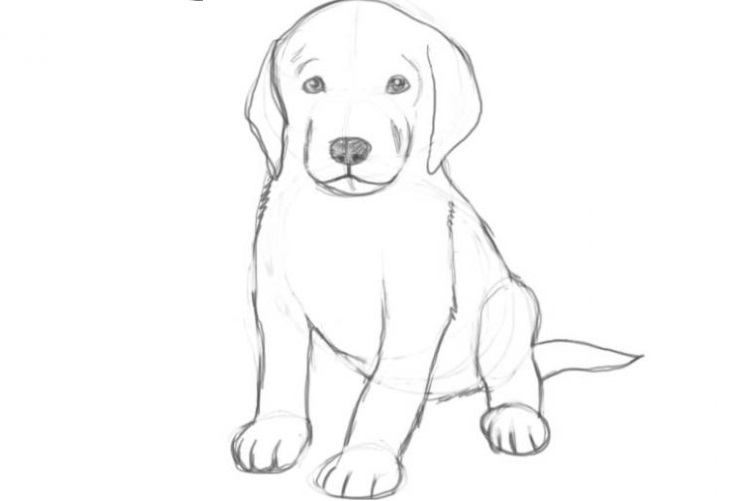
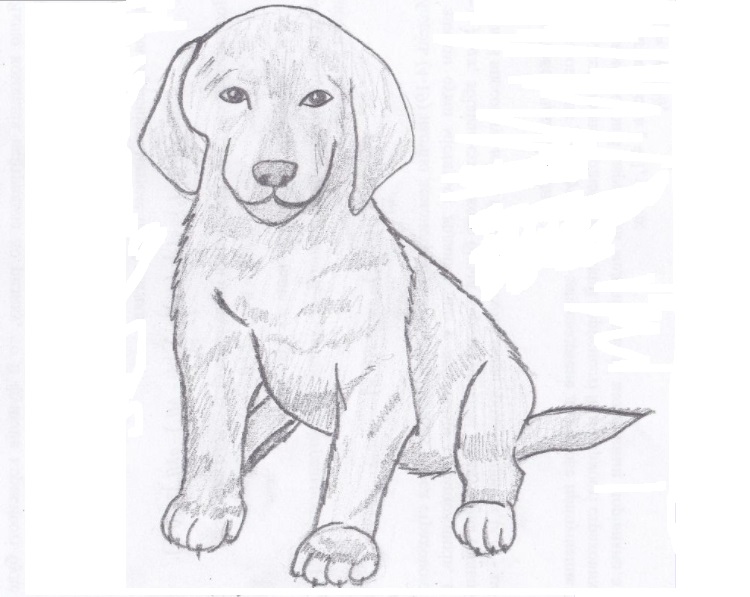
Step 5. Finally, you can draw the fur, add shadows, and blend. This will make the dog look more realistic and alive.
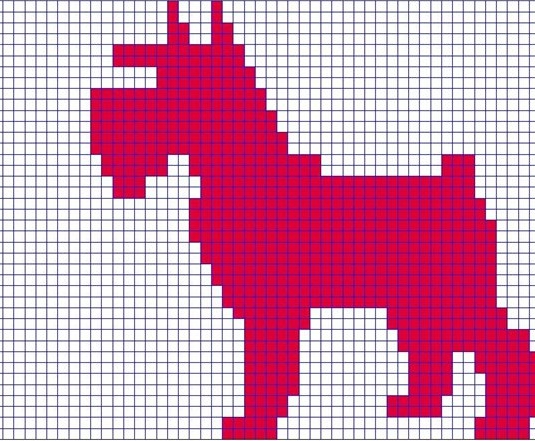
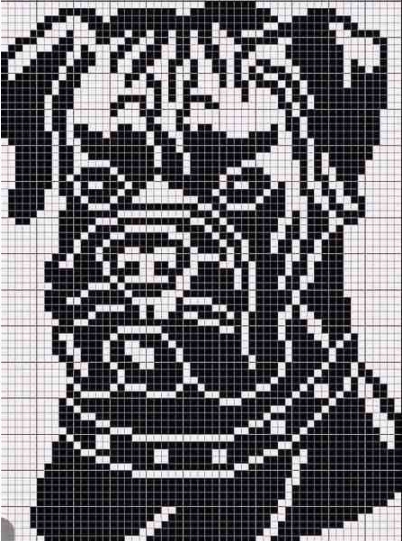
Sketch by cells
Drawings by cells Drawing dogs can be turned into a fun activity for the whole family. Dogs can be simple pictures that need to be reproduced exactly, or they can be used as graphic dictations. These engaging activities will help pass the time in line, on a long commute, or anywhere else. We offer master classes of varying difficulty on how to draw a dog using grids. Some are suitable for preschoolers aged 4-6, while more complex ones are suitable for older children and their parents. You can use either a grid notebook or graph paper.
Graphic dictation "Dog"
For this dictation, you need to take a sheet of squared notebook paper, mark off 6 squares from the top and left, and start drawing.
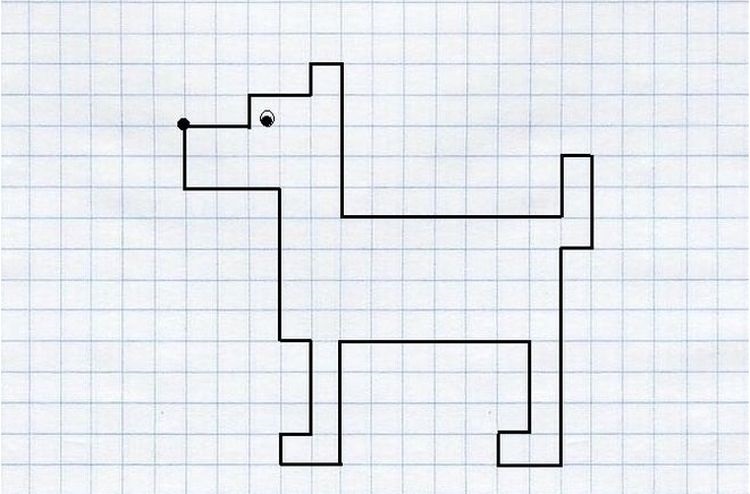
Exercise: 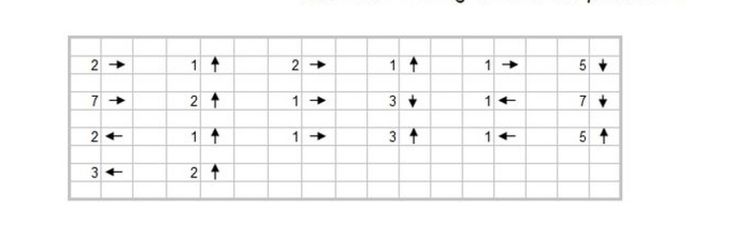
Drawings of dogs by cells
Terrier:
Serious dog:
Mischievous hero
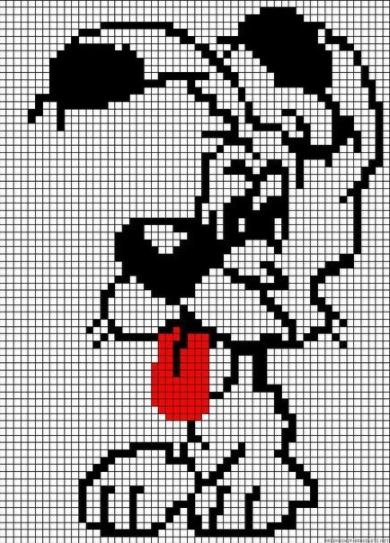
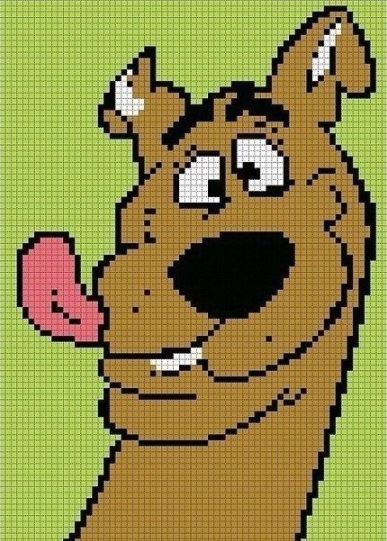
A favorite of many is Scooby-Doo
For experienced artists
The following step-by-step master class will teach a child how to draw a dog with a pencil in just 5 steps.
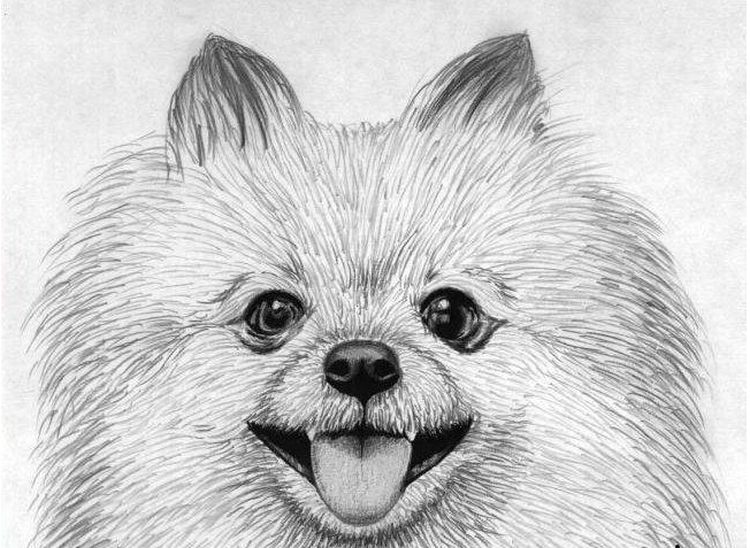
To create a portrait of a Spitz you will need:
- sheet of paper;
- simple pencils: H, B2, B4, B;
- black pen;
- sharpener;
- eraser
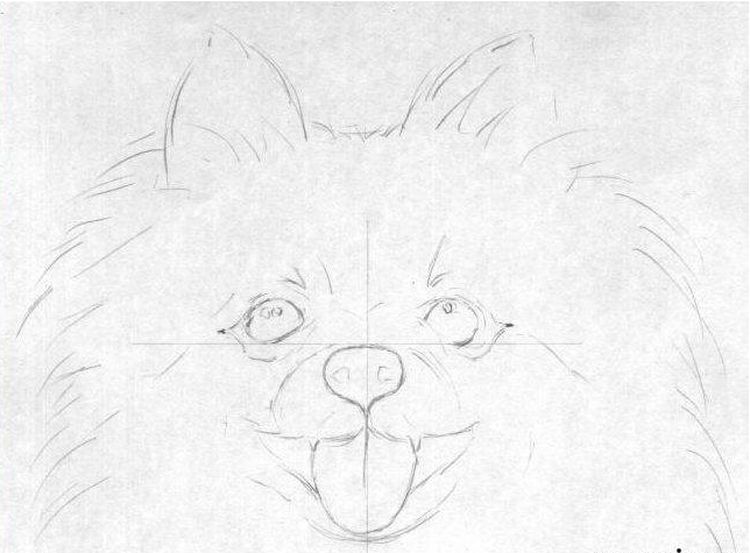
Step 1: Draw the head.
Using a hard pencil H, draw the ears and fur. pet's outlineUsing the proportions shown in the drawing as a guide, we outline the muzzle. We mark the locations of the Spitz's eyes, nose, and mouth.
Step 2: Darken the face.
Using a black pen, shade the darkest areas. These include the nose, mouth, and eye areas.
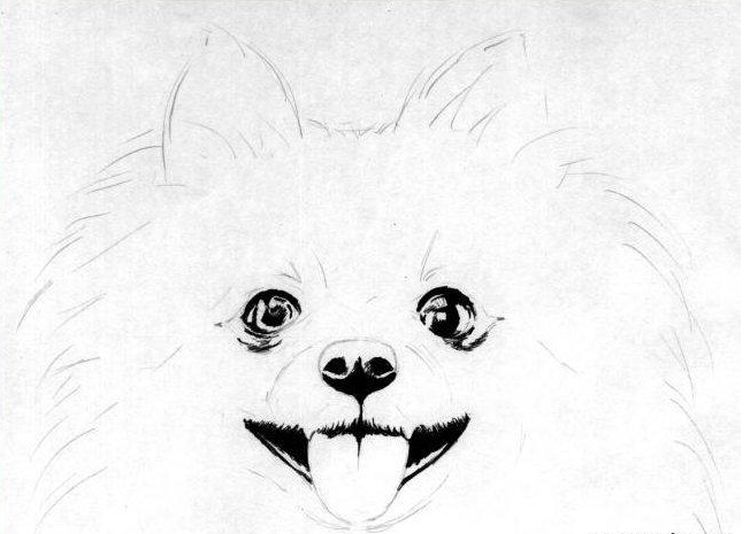
Step 3: Detailing the face.
Using the softest pencil (B4 is best for these purposes), draw the eyes, nose, and protruding tongue.
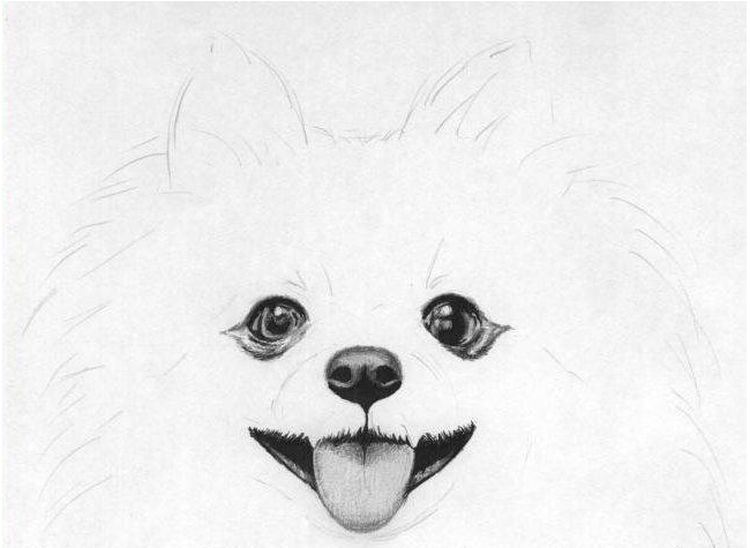
Step 4: Define the shadow.
We determine which side the “light source” will be from and, using a B2 pencil, draw the part of the fur on which the shadow will fall.
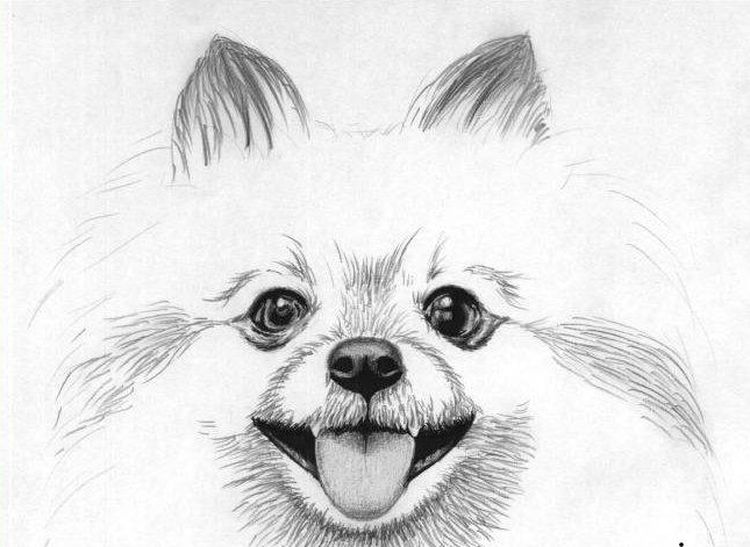
Stage 5: Final
Using a soft B brush, we finish drawing the rest of the fur. Pay attention to the direction of the hairs and the pressure used to apply the shading. The Spitz is ready.
Read also:


2 comments
Lisa
Cool
rice cooker
This drawing turned out pretty simple. Once you've gotten the hang of it, you can try more complex models, like figuring out how to draw a husky or another breed. Good luck with that!
Add a comment